Nightshift Studios

How to Create a Glitter Decal Material
Important Note Before Starting
Adding Glitter Shader to a Decal material is an EXPERIMENTAL feature and is NOT officially supported. This is due to a decal being a projected texture without any inherent vertex normal information.
Known issues
-
Scattering normals will scatter and separate the reflection into four groups.
-
At some angles, Emissive Effects (simulated reflected light) may not “reflect” or be emissive at all.
Add Glitter Shader to a New Project
1. Launch Unreal Engine version 5.4 or above.
2. Create a new project by clicking GAMES, First Person, then the Create button.

3. Close the project.
4. Add Glitter Shader to the project through the Epic Games Launcher -> Unreal Engine -> Library tab or by migrating it from a project that already has Glitter Shader.
5. With Glitter Shader added to the project, reopen the project.
6. Glitter Shader should now be added to the project in the folder Content/GlitterShader.

Create a Glitter Shader Decal Material
1. To keep things simple, for this tutorial we will create a material in the Content folder.
2. Right click in the Content folder and create a new Material.
3. Name it “M_GlitterDecal”
4. Open the material.
5. In the Details panel, set the Material Domain to Deferred Decal, and set Blend Mode to Translucent.

6. Right click anywhere on the grid and create a Material Function Call node.

7. With the node selected, in the Details panel, select the material function MF_Glitter_MakeGlitter.

8. Connect the following outputs from MF_Glitter_MakeGlitter to the main material’s corresponding attributes.
-
Glitter Base Color --> Base Color
-
Glitter Metallic --> Metallic
-
Glitter Roughness --> Roughness
-
Glitter Emissive --> Emissive Color
-
Glitter Opacity --> Opacity
-
Glitter Normal --> Normal

9. Right click to the left of the material function and create a Static Bool node.

10. Set the bool to True and connect it to MF_Glitter_MakeGlitter input “Is Decal?”

11. Click Apply and Save.

12. In the Content Browser, right click the material and Create Material Instance.

13. Name the material instance “MI_GlitterDecal”
14. In the main viewport, navigate to approximately where you would like the decal.

15. With the material instance selected in the Content Browser, go to the Add menu at the top of the screen.
16. Select Visual Effects -> Decal Actor to create a decal actor in the level.
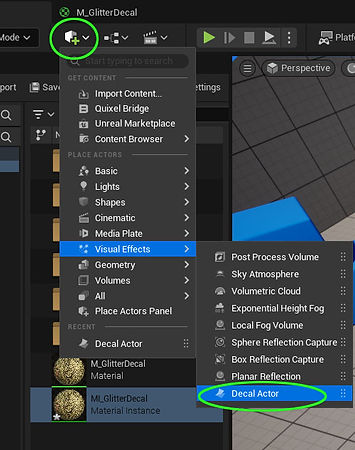
17. That’s it! A glitter decal should now appear on the floor with default settings.
-
Note that if it does not appear, it could be below the floor and just needs to be moved higher.

18. To edit the Glitter Shader parameters, open the material instance MI_GlitterDecal.
19. All of the Glitter Shader parameters are in groups G1 through G7. A full description of parameters can be found in the Glitter Shader User Guide.
